Clockmaking
CLOCKMAKING / FROM THE WORKSHOP
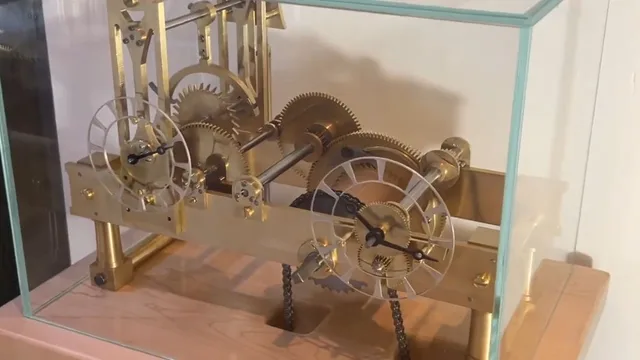
A tower clock. Made from scratch.
From the first frame to the final tick. Follow the making of a mechanical tower clock in the home workshop.
VIDEO SERIESCOMPLETE BUILD
FROM MY WORKSHOP NOTES
A tower clock for a home workshop
I had wanted to build John Wilding’s tower clock for years. At first I imagined a little tower on the roof, or a drive through the wall to an outside dial. Those ideas could wait: first, I needed to make the clock.
Although the design is described as a small tower clock, it is a substantial machine for a home workshop. The build took me from cutting the frame to making the wheels, escapement, winding mechanism, hands and display case. The complete series is collected below, in build order.
Starting with the frame
The first job was to cut and assemble the frame, machine the pillars and pin the structure together. With that foundation in place, I could begin the barrel and its arbor. I made the barrel from beech, one of the materials specified in the plans.
An expensive lesson in wheel cutting
The main wheel was a daunting prospect: a five-inch square of brass, three-eighths of an inch thick, costing £40 at the time. It was an expensive piece of stock to spoil—which, inevitably, I did.
I repaired the first wheel well enough for it to work, but the mistake kept bothering me. Eventually I remade it off camera. The next stages brought together the ratchet, barrel end cap, slip washer, click and spring before I fitted the main wheel and arbor to the frame.
Making use of the tools I have
The second-wheel mounting plates were simple flat parts that I could have finished by hand and on the mill. Looking ahead at the other flat-stock components, though, I decided to use my CNC router.
Drawing the parts in CAD stretched my limited experience, and seeing a large router cut small, thick brass components was satisfying. Having finished them, I did not regret that choice.
For the second arbor I used the wheel I had cut earlier, alongside the main wheel. Its lantern pinion needed 1.2 mm pinion steel, which was becoming difficult to source. Once the pinion was assembled, I could make the arbor and depth the wheels on the frame.
From the first beats to the final reveal
The later videos follow the pallets, pendulum, crutch and suspension, then the first beats and escapement troubleshooting. From there I moved on to a Huygens endless-chain winding system and an automatic winding arrangement using a relay and proximity switch.
The take-off arbor and slip pinion led into making and heat-bluing the hands. A clear glass case, assembled with UV glue, gave the finished clock its home. There is a final reveal and a condensed build video as well as the individual episodes.
AT THE BENCH, ON FILM
The complete build, in order.
Twenty-one build episodes, followed by the condensed retrospective. Choose a preview to watch here.
Clockmaking
Building John Wilding’s Tower Clock: Part 2- Constructing the Frames
Building Wildings Tower ClockClockmaking
Building a Tower Clock Pt. 3 - Pinning the frame
Building Wildings Tower ClockClockmaking
Building a Tower Clock in the home workshop - Part 4: The Barrel and Barrel Arbor
Building Wildings Tower ClockClockmaking
Making a Church Turret Clock in the Home workshop: Pt 5 - The Main Wheel ... disaster averted!
Building Wildings Tower ClockClockmaking
Making a Church Clock in the Home Workshop: Pt 6 - The Ratchet Wheel
Building Wildings Tower ClockClockmaking
Building a Turret Clock: Pt 7 - Barrel End Cap, Cutting Brass Disk Blanks & General Update
Building Wildings Tower ClockClockmaking
Building a Tower Clock in the Home Workshop - Pt 8 - The Slip Washer
Building Wildings Tower ClockClockmaking
Building a Tower Clock Pt 9 - The Clickspring - Click, Spring and Screw
Building Wildings Tower ClockClockmaking
Building a Tower Clock - pt10 Main Wheel Bushes and Fitting the Main Wheel Arbor
Building Wildings Tower ClockClockmaking
Building Wildings Tower Clock in the Home Workshop - pt11 - Flat Stock Parts
Building Wildings Tower ClockClockmaking
Making a Clock Lantern Pinion for Wildings Tower Clock pt12 - 2nd Arbor Complete
Building Wildings Tower ClockClockmaking
Making the Pallets for Wilding’s Tower Clock | Pt.13 – Frame, Fit & Finish
Building Wildings Tower ClockClockmaking
Building the Pendulum for Wilding’s Tower Clock | Pt.14 – Crutch, Suspension & Frame Work
Building Wildings Tower ClockClockmaking
Wilding Tower Clock Finally Runs! | Pt.15 – First Beats & Escapement Troubleshooting
Building Wildings Tower ClockClockmaking
Building a Huygens Endless Chain Winding System | Tower Clock Pt.16
Building Wildings Tower ClockClockmaking
Automatic Winding System for Tower Clock | Pt.17 – Relay & Proximity Switch Setup
Building Wildings Tower ClockClockmaking
Tower Clock Build Pt.18 | Take-off Arbor & Slip Pinion Mechanism
Building Wildings Tower ClockClockmaking
Handmaking & Heat Bluing Clock Hands | Tower Clock Build Pt.19
Building Wildings Tower ClockClockmaking
Building a Clear Glass Display Case with UV Glue | Tower Clock Build Pt.20
Building Wildings Tower ClockClockmaking
Building a Tower Clock: The Final Reveal After 5 Years! (Part 21)
Building Wildings Tower ClockClockmaking
Building a Mechanical Clock - 6 Years of Clockmaking in Just 50 Minutes!
Building Wildings Tower ClockNo videos found.
Try a different title, subject or series.