HAM PILOT / BY G1CEC
Ham Pilot.
A window on HF.
Live reports, DX spots, propagation and a shack clock. A compact touchscreen companion for the radio bench, powered by an ESP32.
A COMPANION FOR THE SHACK
Keep an eye on the bands.
Ham Pilot brings several useful views together on a small, self-contained display. It connects to your Wi-Fi and cycles between pages; there is no CAT connection and no need to leave a computer attached.
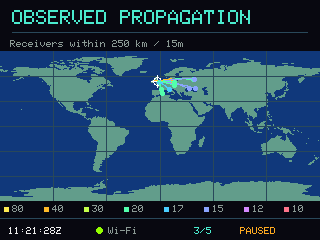
Observed HF propagation
Recent PSK reports from receivers near your chosen location, across 80, 40, 30, 20, 17, 15, 12 and 10 metres.
DX spots at a glance
A six-row spot list with countries and colour-coded modes. Tap a row for the details.
A view of the world
An observed-propagation map with the day/night boundary and the Sun’s position.
Time, outlook & calendars
UTC and local time, sunrise and sunset, HamQSL’s HF outlook, solar figures and contest/DXpedition information.
These are reports and outlooks, rather than a measurement of your own antenna. Missing reports do not necessarily mean a band is closed.
BEFORE YOU PLUG IT IN
The right little display.
This firmware is for the Diymore 2.8-inch ESP32-32E board with 4 MB flash, an ILI9341/ILI9341V LCD and XPT2046 resistive touch. It runs in 320 × 240 landscape orientation. No extra wiring is needed on the supported board.
Similar-looking “CYD” boards can have different displays or wiring. The installer can recognise an ESP32 chip, but it cannot confirm the display model for you.
- A supported board and a USB cable that carries data.
- A computer with desktop Chrome or Edge and an available USB port.
- A 2.4 GHz Wi-Fi network with internet access.
FROM THE PAGE TO THE DISPLAY
Plug in. Install. Set up.
Connect the supported board to your computer, close other software using its serial port, then open the installer below.
Install Ham Pilot
VERSION 0.3.5Confirm your board to open the installer. You will choose its USB port before anything is written.
After installation, continue with the display’s own setup screens below. If the browser cannot find the board, check the data cable and USB driver. The manual instructions also describe BOOT/RESET and a slower upload option.
Manual installation instructionsFIRST START
Make it your station.
- Calibrate the touchscreen. On a fresh installation, tap and release each of the three targets.
- Enter your details. Add your callsign, Maidenhead locator, place and Wi-Fi in Settings, then save. Check the time zone and reporting filters for your location.
- Let the reports arrive. Give the display time to connect and download its first reports, schedules and outlook. The clock obtains internet time.
You can then disconnect the computer and power the display from a suitable USB supply.
Using the display
Tap the footer clock for Settings, Info for calendar information, or a DX row for spot details. Tap the blank header area to advance a page. Hold for about a second to pause/resume cycling; a longer hold of about four seconds opens Settings. Page durations are adjustable.
Set up through a local browser
The device’s Web setup screen gives its address and login. During access-point setup, join HAM-Display-Setup with the password shown on the display, then visit 192.168.4.1. The username is ham, using that displayed password.
What is included?
This is an HF display for online reports and time. ADIF import and DXCC logbook analysis are planned separately and are not included in this firmware. It does not control your radio.
THE PROJECT FILES
Firmware, notes & licences.
Prefer a manual upload? The firmware package includes the four images, checksum-verifying Windows uploader, instructions and licence notices.
Download firmware v0.3.5 1.1 MBHam Pilot’s application is provided under PolyForm Noncommercial 1.0.0. Third-party components retain their own licences.